
The Ultimate Guide to Action Camera ND & CPL Filters: How to Get True Cinematic Footage on GoPro & DJI Osmo Action
Action cameras like the GoPro Hero series and DJI Osmo Action pack incredible sensors into pocket-sized bodies. Out of the box, they capture ultra-sharp, vivid 4K and 5.3K video.
Yet, when you look at high-speed riding, drone footage, or bright outdoor vlogging, you might notice something feels off: the footage looks hyper-sharp, jittery, or clinical—almost like a high-end smartphone recording rather than a film.
The secret behind smooth, cinematic action footage isn’t a post-production trick. It’s an optical accessory: Neutral Density (ND) and Circular Polarizing (CPL) filters.
In this guide, we break down what these filters actually do, how to dial in your camera settings to use them properly, and how choosing the right filter will instantly elevate your videos.

Caption: Default high shutter speed (left) vs. cinematic 180° shutter blur with an ND filter (right).
What Does an ND Filter Actually Do?
Think of an ND (Neutral Density) filter as sunglasses for your action camera lens. It reduces the amount of light entering the sensor without altering colors or introducing color cast.
Action cameras have a fixed aperture (usually f/2.0 to f/2.8). Because you cannot close down the aperture on bright sunny days, the camera compensates by ramping up the shutter speed—often hitting 1/1000s, 1/2000s, or even faster.
The Problem with Ultra-Fast Shutter Speeds
When the shutter fires that quickly, every single frame is frozen in time. While this sounds great for high-speed sports, in video playback it causes:
-
Choppy, staccato movement: Objects moving past look jittery.
-
Lost sense of speed: Roads, gravel, and trees in your peripheral vision look completely static rather than sweeping past.
-
Digital harshness: Footage looks hyper-processed and unnatural.
The 180-Degree Shutter Rule
To recreate how the human eye naturally perceives movement, filmmakers use the 180-degree shutter rule:
$$\text{Shutter Speed} = \frac{1}{2 \times \text{Frame Rate}}$$
Frame Rate (FPS) |
Ideal Target Shutter Speed |
24 fps (Cinema standard) |
1/48s (or 1/50s) |
30 fps (Standard video) |
1/60s |
60 fps (Smooth action / light slow-mo) |
1/120s |
120 fps (High frame rate / slow motion) |
1/240s |
On a bright sunny day, shooting at 1/60s or 1/120s without a filter will completely overexpose your shot into a white blowout. An ND filter cuts the light, allowing you to lock in that slow shutter speed and capture natural motion blur.
The Workhorses: Deep Dive into ND16 and ND32
While ND kits usually range from ND4 up to ND64, ND16 and ND32 are the two filters action camera users mount 80% of the time.
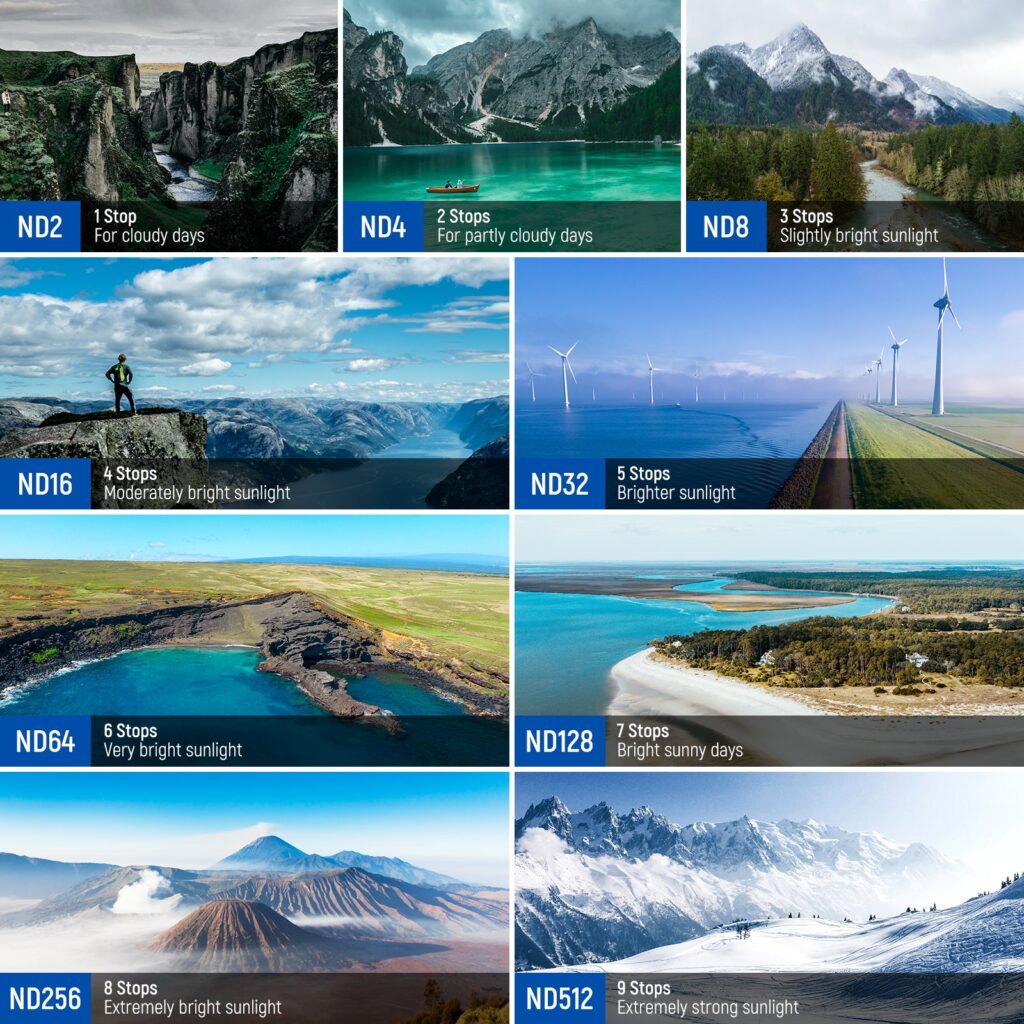
Caption: ND16 and ND32 are the core essentials for outdoor daylight shooting.
1. ND16 (4-Stop Light Reduction)
-
Light Transmission: Lets in only 6.25% of ambient light (1/16th).
-
When to use it:
-
Overcast to partly cloudy days.
-
Golden hour (early morning or late afternoon sun).
-
Open shade or woodland trails where direct overhead sun isn’t piercing through.
-
-
Why it matters: It gives you just enough cut to drop your shutter down to 1/60s or 1/120s without plunging your shadows into darkness when moving through variable lighting.
2. ND32 (5-Stop Light Reduction)
-
Light Transmission: Lets in only 3.125% of ambient light (1/32nd).
-
When to use it:
-
Bright, direct, overhead daylight.
-
Mountain riding or open highway motorcycling at noon.
-
High-reflectivity environments (beaches, coastal waters, or sand).
-
-
Why it matters: Under harsh direct sun, an ND16 often isn’t dark enough to keep your shutter at 1/120s without blowing out highlights. ND32 provides the optical density required to keep your sky rich blue and your road texture smooth.
Cutting Glare & Boosting Contrast: The Role of the CPL Lens
A Circular Polarizer (CPL) filter serves a completely different, equally critical purpose. Instead of merely dimming the scene uniformly, a CPL works by selectively blocking polarized light waves bouncing off non-metallic surfaces.
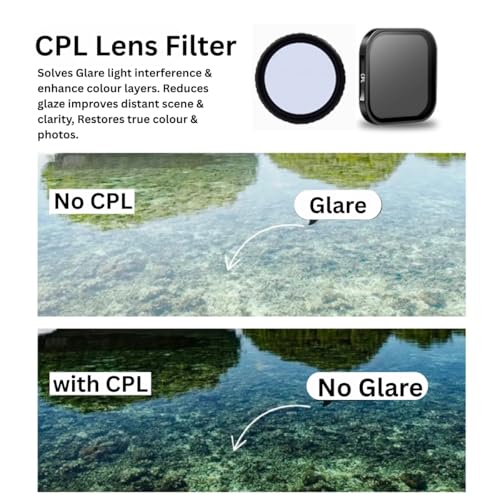
Caption: CPL filters eliminate distracting surface reflections and restore natural color depth.
When to Use a CPL Lens:
-
Water & Marine Sports: Kayaking, surfing, fishing, or swimming. A CPL cuts the blinding reflective sheen off the water’s surface, revealing rocks, fish, and sand beneath.
-
Motorcycle & Helmet Rigs: If you have an action camera mounted inside a car windshield or behind a motorcycle visor, a CPL knocks down reflections from the glass/plastic.
-
Foliage & Landscapes: Direct sunlight reflects off waxy leaves, making green landscapes look washed out. Rotating a CPL restores deep, natural greens and enhances cloud separation against blue skies.
Pro Tip: Most quality CPL filters feature a rotatable front ring. Once mounted on your GoPro or Osmo Action, look through your screen and rotate the bezel until reflections disappear and sky contrast peaks before you press record.
How to Set Up Your Action Camera for ND Filters (Step-by-Step)
If you leave your camera on full Auto mode, it will fight the ND filter by automatically increasing your ISO, introducing unwanted digital noise! Follow these camera settings:
-
Set Shutter to Manual:
-
If shooting at 30 fps, set Shutter to 1/60s.
-
If shooting at 60 fps, set Shutter to 1/120s.
-
-
Lock Your ISO:
-
Set Min ISO to 100 and Max ISO to 100 (or 200). Never let ISO float to 800 or 1600 in daylight.
-
-
Mount the Filter:
-
Look at your screen. If the image is still too bright at 1/120s with an ND16, swap to an ND32. If it looks dark/underexposed, switch down to an ND8 or remove the filter.
-
-
Electronic Image Stabilization (EIS) Caution:
-
Systems like GoPro HyperSmooth and DJI RockSteady require some light texture to stabilize frames. If you use too dark an ND filter (forcing too low a shutter speed during extreme jarring bumps), you can introduce “micro-jitter” in the stabilization. For high-vibration activities (like MTB trails), stick to 60 fps at 1/120s with an ND16/32 for the sweet spot between stabilization stability and cinematic blur.
-
Quick Reference: Which Filter Should You Mount?
Lighting Condition |
Best Filter Choice |
Target Shutter Speed |
Overcast / Deep Shade / Late Evening |
No Filter or ND4 / ND8 |
1/60s – 1/120s |
Partly Cloudy / Forest Canopy Trails |
ND16 |
1/120s (at 60fps) |
Full Sun / Open Highway / Beach |
ND32 |
1/120s (at 60fps) |
Snow / Glacial / Ultra-Intense Desert Sun |
ND64 |
1/60s – 1/120s |
Lakes, Rivers, Watersports, Glass Reflection |
CPL |
Auto / Matched to light |